
Crabtree Falls, North Carolina, US
How To Take Waterfall Pictures Successfully
I want to point out a few tips on how to take waterfall pictures that are creative in style.
You may have noticed when looking at images of waterfalls that many show the cascading water in a smooth, silky way. Whether you like the final result or not is a matter of personal choice. I do.
Having conducted a poll over many years asking:
‘What is your opinion of this silky effect on waterfalls?’
93% said they liked the effect, while 7% thought that it did little to improve the overall image.
As photographers are using this technique, I wanted to know more. So, on a recent trip to the Appalachian Mountains in North Carolina I set about finding out for myself.
My equipment was a small Nikon D90 DSLR camera, a bunch of different lenses and my Manfrotto tripod.
I hunted out a few interesting local waterfalls. Some even had gorgeous splash pools that one could swim in! Then, I set up the camera on my tripod and began to shoot the flowing water at different shutter speeds and exposures.
Why Choose This Silky Effect?
To produce images with movement.
When you take a shot of moving water in auto mode with any camera, the shutter speed is so fast that it will freeze the motion of the water flow. This is fine so long as you aren’t looking for any movement in the water.
Therefore, if you shoot with a shutter speed faster than 1/125 sec, the motion will be frozen. To get the feel of movement, shooting with a slower shutter speed of say 1/5 sec. or even up to 2 seconds is desirable.
The main drawback with longer shutter speeds is that excess light can enter the camera resulting in overexposure. To compensate for this, pay attention to both ISO and aperture settings and use a neutral density grad filter. Also, don’t forget a polarizer is a must as well.
How To Setup Your Camera
Do not use AUTO mode.
There is no way you can get this silky effect by using your camera in AUTO mode. It is there to help you get a clear, sharp picture without you having to intervene at all.
So, if you are unhappy moving away from the safety of Auto, now is your chance to experiment and learn more about the MANUAL modes.
The Manual mode dial setting required is SHUTTER PRIORITY:
- On Nikon cameras set the dial to – S
- Canon cameras set the dial to – Tv
Once in shutter priority mode, you can set the shutter speed yourself while the camera will automatically set the aperture setting or f/stop.
Set up your camera on a tripod to avoid camera shake, and use one of the following to ensure absolute steadiness when taking the shots:
- timer delay…
- or a shutter release cable…
- or remote unit.
How To Get The Exposure Right
Timing, filters & ISO
There are a few things that you can do to decrease the amount of light entering your camera and improve your exposure levels:
Timing – this might sound odd, but shooting waterfalls on sunny days could well result in overexposed images. With longer shutter speeds, too much light is going to come through the lens on a bright day. The best conditions for shooting are with an overcast sky or even a dull showery day, and also around sunrise and sunset when the light is less bright.
Filters – using a filter that cuts down the amount of light entering your camera can also help. There are numerous filters available that do this, but I always use a polarizing filter as it not only cuts down the light getting in but also can help you improve your shots (they cut down on reflections in shots – and waterfalls can have quite a few of these). Another type of filter you might like to use is a neutral density filter. This is a filter that cuts down the light entering your camera – almost like putting sunglasses on.
Aperture Priority Mode – if you are still having trouble with exposure even at darker times of the day and while using a polarizing filter, another approach you can take is to switch to Aperture Priority Mode. Choose the smallest aperture possible. On most cameras, this will be f/22 or f/36. The result of choosing this is that your camera will automatically choose the longest shutter speed available for that aperture. It may not be 2 seconds – but it will almost always be longer than the shutter speed in that first control shot you took – and as a result, the water will blur more than in the first shot. Another benefit of having a smaller aperture is that you’ll have a larger depth of field, so more of the waterfall will be in focus.
Low ISO – Choosing a lower ISO will mean that your camera’s sensor is less sensitive to light and will need the shutter to be open longer. It will also mean less ‘noise’ in your shots which will improve the detail.
Understanding Exposure
Understanding Exposure, Fourth Edition: How to Shoot Great Photographs with Any Camera

Bryan Peterson is a well known professional photographer and the founder of the photo learning site, www.PPSOP.com. He has also produced numerous videos on photography tips, techniques and compositions.
This book is one that everyone wanting to grasp a full understanding of exposure should think about getting.
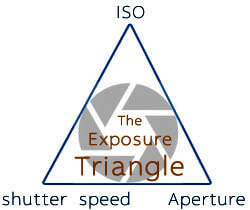
The Exposure Triangle
The 3 important elements
Bryan Peterson, in his book Understanding Exposure, goes into detail on how to move away from the camera’s AUTO mode and start to experiment with its MANUAL settings. This is the vital first step!
There are three main elements to be taken into account, and thus it is called ‘the exposure triangle’.
Each of the three aspects of the triangle relates to light and its interaction with the camera.
The three elements are:
- ISO – the measure of a digital camera sensor’s sensitivity to light
- Aperture – the size of the lens opening when a picture is taken
- Shutter Speed – the amount of time that the shutter remains open
An image’s exposure is worked out using the intersection of these three elements. If you change any one of them, it will impact on the other two, so it’s important always to bear this in mind.
How To Get The Shot Right
Experiment
Getting the exposure right is only part of the equation when it comes to photographing waterfalls. Here are some extra tips which you might find helpful:
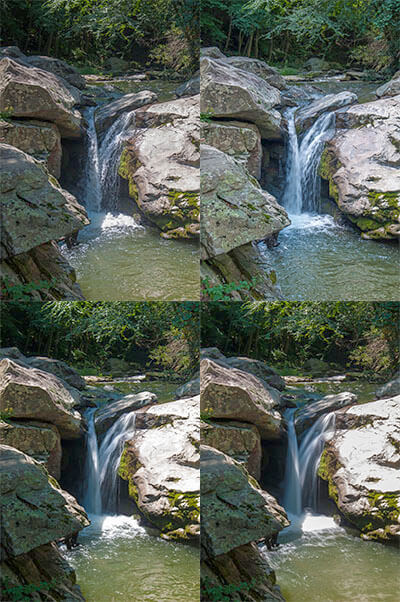
Bracket your Shots
The first time I did some waterfall photography using my Nikon D90 DSLR camera I spent a few days in the western part of North Carolina where there are many waterfalls. Unfortunately, I only managed to visit three waterfalls worthy of note – but I shall return one day!
Update Oct 2018: More great waterfalls on a visit to the Great Smoky Mountains.
What I learned during that visit was the importance of bracketing my shots – which is taking a series of shots at different shutter speeds and apertures. Doing this meant that I could capture a variety of very different images of exactly the same scene with changes in the extent that the water was blurred, changes in the depth of field and changes in the way the camera captured color.
Use your cameras built-in exposure bracketing (check your manual). Then bracket your shots to guarantee a wide range of images to choose from.
Don’t Be Obsessed with Blurry Water
The effect of silky smooth moving water in your shots is difficult to resist but don’t let it become the only type of waterfall image that you capture. Try taking some shots with ultra-fast shutter speeds also. This can especially be a powerful technique on raging waterfalls where there is lots of spray and explosive splashes. The other impact of faster shutter speeds is that you’ll need to use larger apertures. So, that means a narrow depth of field which will bring a whole new impact to your shots.
Experiment and Learn New Techniques
Get out and about and shoot away because the more you do, the better you’ll get. What I love most about waterfall photography is the atmosphere of each location. The peace and quiet, the birdlife and wildlife – and of most of all the thunder of the falls themselves.
Go out and shoot with confidence!
Laurel Creek Falls
 Small waterfall in NC
Laurel Creek Falls is a very small waterfall west of Boone in North Carolina. Locally known as Trash Can Falls, it derives its name from the proximity of an old trash can dump location. It is a popular site for Appalachian State University students to cool off in and is an attractive place to picnic in.
The waterfall itself is in a quaint setting with large rock formations surrounding the cascading stream. The water drop is perhaps only 10 feet high, but the river level was low when we were there.
Directions: Located west of Boone off of Route 321, it is 5.4 miles west of the intersection of routes 421 and 321.
After 5.4 miles and just after crossing a bridge look for a pulling-off/parking area on the right – then park up. Opposite you will be Laurel Creek Road. Cross over the road (Route 321) and look for the small trail which will lead up to the falls (about 200 yards).
Have a good tripod with you.
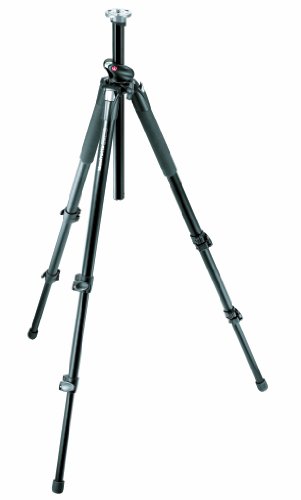
Manfrotto 055XPROB Pro Tripod Legs (Black)
Manfrotto tripods are renowned for their superior design and quality. By fitting a bespoke tilt or ball head to the main stand, you will be ready to tackle any fast-moving subject with a sturdy footing.


Elk River Falls – Near Boone, NC

A few miles from Banner Elk near Boone, NC I was at Elk Falls on a late June afternoon. It was a particularly sunny day, not ideal for taking slow shutter speed photography. I wanted to capture the falling water and show that dreamy, silky look in my shots. Waiting for duller, cloudy conditions didn’t happen! So, it was a matter of doing the best under the conditions trying to remember all about the exposure triangle.
Equipment:
I had a circular polarizer and UV filter on my Nikon AF-S 70-300mm VR Lens but no neutral density grad filter.
Camera Settings:
I was hoping to be able to get a shot at a shutter speed of 1 sec. or thereabouts, but that proved to be too long an exposure in the conditions. I set the exposure compensation to -5EV (5 stops of negative compensation) and shot in aperture priority mode.
f/29 was the aperture setting.
The shutter speed was 1/10 sec. (with -5EV), which still managed to achieve what I was after.
Had it been a dull day or had I been there at dawn or dusk, results could have been more dramatic. Anyhow, it was a great day. Then suddenly I saw a huge splash – someone had jumped from the top of these 50′ falls.
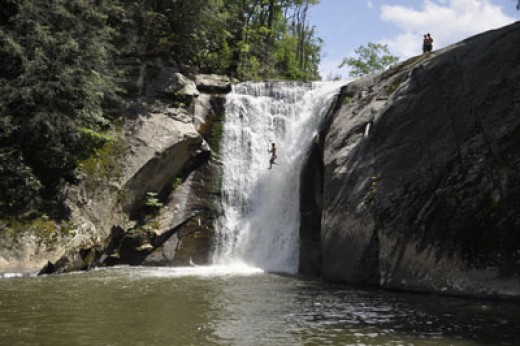
DO NOT JUMP OFF THESE FALLS
MANY PEOPLE HAVE BEEN KILLED HERE
Directions:
From the intersection of NC194 and US19E near Elk Park, drive 0.7 miles west on 19E.
Turn right down a hill, immediately turn left on SR1303 – Old Mill Rd. This turn is easy to miss.
Continue for 0.3 mile then turn right on Elk River Rd.
Now proceed on Elk River Rd for 4 miles into the Pisgah Forest where the road ends at the small parking area.
You may be interested in this article as well: Waterfalls in North Carolina
What are your experiences of shooting waterfalls, and do you prefer the silky effect or not?
Please leave us a comment below…